Showing posts with label dinner. Show all posts

Thursday, March 5, 2015

Simply Stunning Stuffed Shells

I think this is it, people. I think this is the end of the (really) cold weather. The ten-day forecast is hopeful, with highs mostly in the 40s, and one day with a predicted high of 50!! After a historically cold and snowy February, this forecast fills me with an embarrassing amount of joy.

IMG_0681

Sometimes the idea of blogging about my faith, especially my Lenten practices feels strange to me - it feels against the spirit of Matthew 6:17 fasting, like if I bring this part of my life into a public arena, it will have less impact, make less of a difference in my life. But then as I read others' blogs, I remember why this kind of sharing is important. Bonnie wrote about her struggles through Lent, her struggle to challenge herself while also remaining realistic in the face of the everyday sacrifice of motherhood, and I felt encouraged, emboldened, and refreshed. I felt like I had a companion on the journey. Then Jenny shared a post challenging us to take a closer look at the media we consume, to really test whether it is strengthening or weakening our character, our conscience. I admire these women who are sharing their hearts, because they encourage me in my life, help me to be better, challenge me to look closer and dig deeper. I am grateful.

IMG_0686

I guess the key is, as in all things, purity of motive. Why do I feel compelled to share? Do I want applause and accolades? To gain the admiration (and maybe even envy) of my peers? Or am I looking to pay it forward, in the hopes that something I share will encourage someone, help them to live their faith in the way so many bloggers have inspired me to live mine? The key is humility, which is so very hard to nail down, so difficult to live in reality.
IMG_0687

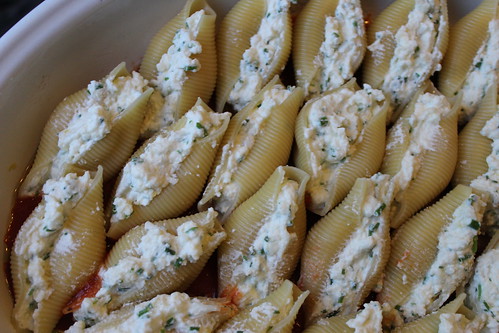
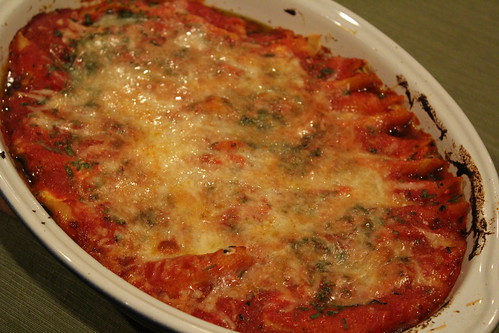
I originally shared this recipe in 2011, and I've only made it a handful of times between then and now. I can't for the life of me figure out why, since it's so simple to make, and results in such a lovely, sparklingly special finished dish. Perfect for a Lenten Friday evening, or any other time when you'd rather avoid meat.
IMG_0691

Simply Stunning Stuffed Shells
adapted from 101cookbooks

1 box jumbo dried pasta shells (you will end up with a few extra shells)
zest of 1 lemon

For the sauce:
1/3 cup olive oil
1/2 teaspoon red pepper flakes
1 teaspoon kosher salt
4 cloves garlic, finely chopped
1 28-ounce can crushed tomatoes
1/4 cup chopped fresh basil

For the filling:
1 15-ounce container whole-milk ricotta
1 egg
1/4 teaspoon salt
1 cup grated mozzarella
1/4 cup grated parmesan
1 bunch chives, minced

Put a large pot of water on to boil.  Preheat oven to 350.  Coat bottom and sides of a 9x13-inch baking dish with olive oil, and sprinkle half of lemon zest over it.

For the sauce, combine olive oil, salt, pepper flakes and garlic in a saucepan, stirring over medium heat just until fragrant, being careful not to burn.  Add tomatoes and stir until hot.  Remove from heat, stir in basil, and taste for seasonings.

For the filling, combine ricotta, egg and salt in a bowl and mix well.  Stir in mozzarella, parmesan, remaining half of lemon zest, and 3/4 of chives.  Set aside.

Cook shells in boiling, salted water until just barely done - if you overcook them, they'll fall apart when you try to stuff them.  Drain and cool slightly.

Spread 1/3 of sauce over the bottom of the pan.  Fill each shell with ricotta filling, and nestle them closely together on top of the sauce.  Spoon remaining sauce over, and then sprinkle with chives and a little bit of extra mozzarella and parmesan.  Cover with foil and bake 15 minutes, uncover and bake another 15 minutes, until cheese is melted and sauce is bubbling.  Serve with garlic bread. Or garlic knots!

Monday, January 28, 2013

Kale, Butter Bean, and Shrimp Couscous Bowl

image

The other day I went out for a walk, which is quite a production these days. Giant stroller, warm clothes for mamma and baby, diaper bag filled with essentials, keys, phone. I got all the way outside and realized I had forgotten my phone. I stood still for a second, considering my options, and decided that it might be good for me to be without my phone for a few minutes. For the first half of the walk, I had company, so it was no problem. As soon as my friend and I parted ways, though, I started feeling like I needed my phone. At least 4 times, I caught myself reaching for it. It turned into a great exercise, because without the constant ability to check on things and communicate with people, my mind was able to have a little break. I was truly amazed at how refreshed I felt and how sparkling clear my thoughts became.

I think I may make a habit of forgetting my phone more often.

image

Kale, Butter Bean, and Shrimp Couscous Bowl

adapted from Food and Wine, February 2013

This recipe takes less than 10 minutes to come together, and it is exceedingly delicious. Leftovers are great for lunch, especially if you only cook the shrimp as needed.

2/3 cup whole wheat couscous
3 tablespoons extra virgin olive oil
1 pound shelled and deveined medium shrimp
1/2 teaspoon crushed red pepper
2 tablespoons unsalted butter
one 15-ounce can butter beans, rinsed and drained
2 tablespoons capers
1 1/2 tablespoons fresh lemon juice
1 bunch lacinato (Tuscan) kale, ribs removed, chopped
salt and pepper to taste

In a bowl, combine the couscous with 3/4 cup boiling water, cover and let stand for 5 minutes. Fluff with a fork. In a nonstick skillet, heat the olive oil over medium heat. Add the shrimp, a sprinkle of salt, and the crushed red pepper and sauté until opaque, about 2 minutes. Transfer to a plate and set aside. In the same pan, melt the butter. Add the beans, capers, and lemon juice and cook until the beans are hot, about 2 minutes. Add the beans to the couscous and toss, tasting and adjusting seasonings. In the same pan (again!), add the kale and another sprinkle of salt, and cook for about a minute, stirring constantly, until it is bright green but still holds most of its shape. Divide the kale and bean/couscous mixture between 4 bowls, and top with the shrimp.

Serves 4.

Wednesday, June 13, 2012

Cream of Asparagus Soup

Cream of Asparagus Soup

**NOTE: I have fixed the thing that was making it impossible to pin photos to Pinterest, thanks to this helpful post. If you have a blog and you've been having the same issue, I hope that helps! If you don't have a blog but you like to pin my posts and recipes, thank you! I love it when you share!!

For my blogday, I asked people to suggest things they'd like to see on the blog. My good friend Cassie asked for some asparagus soup, and since this hot weather is about to send the asparagus packing, it's now or never! I had never had asparagus soup before, and I have to say this is not my favorite preparation of this vegetable. Upon first taste I thought maybe I hadn't seasoned it well, or maybe it was too much stock and not enough vegetable, but after letting it rest a day in the fridge it turns out it was actually a pretty nice soup. It's just very, very subtle. And since asparagus has such a short season, I'd rather just barely saute it and toss with pasta, or shave it and pile it on a pizza, or steam it and dip it in a creamy sauce. But! If a velvety, subtly-flavored light green soup sounds like just the thing for you, give this a try!

Asparagus


Cream of Asparagus Soup

I've seen several recommendations from other sources that if you puree asparagus, you should strain it to remove any lingering tough or woody pieces, but I found it to be an unnecessary step. My soup was plenty smooth without straining. Follow your heart, though, and make sure to trim your asparagus well. Peeling the hard edges might also help with especially woody asparagus.

2 tablespoons extra virgin olive oil
1 bunch spring onions, or 1/2 Vidalia onion, chopped
1 clove garlic, minced
1 pound fresh asparagus, trimmed and cut into 1- to 2-inch lengths
4 cups water, vegetable stock, or chicken stock
1/2 cup heavy cream
2 tablespoons unsalted butter
salt and pepper to taste

In a soup pot, warm the oil over medium heat. Add the onions and garlic and saute about 3-5 minutes, until slightly softened. Add asparagus and toss together. Season with salt and pepper, add the water or stock, and simmer until the asparagus can be easily smashed against the side of the pot with a spoon, about 10-15 minutes (more or less depending on how thick your asparagus is). Puree in batches in a blender, and then return to the pot over low heat. Stir in the butter and cream, taste, and adjust seasoning. Serve warm or cold.

Yield: about 4-6 servings


Thursday, June 7, 2012

Slow-Roasted Wild Salmon

Slow Roasted Salmon 2

I've been reading Nina Planck's Real Food: What to Eat and Why a little before bed each night for the past couple of weeks. It's making me feel really good about making food decisions that are extremely, ridiculously pleasant. Like whole, pastured, non-homogenized (when I can find it) dairy, which tastes so, so much better than its non- or low-fat counterparts. Or grass-fed beef, which is naturally lean, tastes amazing, and is chock-full of healthy cholesterol. Or pastured eggs, with their bright orange, protein- and omega-3-rich yolks.

Slow Roasted Salmon

Then there's wild salmon, the chapter I'm currently reading. I'm beginning to believe that wild salmon is the answer to all modern health issues. People who eat salmon once a week are at a decreased risk of heart attack, stroke, heart arrhythmia, high blood pressure, and high triglycerides in the blood. Omega-3s help to regulate blood sugar and suppress insulin resistance. It's been well-documented and publicized that DHA, a type of omega-3 fatty acid found in high concentrations in salmon, is vital for fetal and infant development, but why? Our brains are made of about 60% fat, and the most important type of fat is - you guessed it - DHA! DHA consumption has been linked to higher IQ and brain function, and to a decreased risk of neural and spinal birth defects.

Ever heard of pregnancy brain? I'm starting to wonder how much of that little-understood, anecdotal symptom of pregnancy could be solved by a couple more servings of fish each week. Developing babies take the nutrients they need from their mothers, whether or not said mothers are conscious of the nutrients they consume. Since our bodies don't produce DHA, but store a lot of it in our brains, maybe those little fetuses are taking mom's brain in order to make their own! If you're pregnant and feeling strangely forgetful, or you'd like to reduce your risk of cardiovascular health issues and type-2 diabetes, make some salmon for dinner tonight!

Summer 2012 049

Summer 2012 067

Slow Roasted Salmon

adapted from Bon Appetit

Seek out wild salmon when you're shopping. Farmed salmon is higher in mercury, less sustainable, and much lower in omega-3s. It's also fed dye so that it looks like salmon. The flavor and texture of wild salmon are vastly superior.

2 six-ounce center-cut fillets wild salmon
3-4 tablespoons extra virgin olive oil
assorted fresh herbs, about a cup total (I used thyme, basil, and parsley - dill or rosemary would be great!)
salt

Preheat oven to 325 degrees. Coat the bottom of a baking sheet with a couple tablespoons of the oil, and arrange the herbs in two piles, about the size of the salmon fillets. Lay the salmon skin-side down over the herbs, drizzle with another tablespoon oil, and season lightly with kosher salt. Bake about 25 minutes, until the salmon is just tender - a knife will slide easily into the flesh. Serve warm or at room temperature.

Serving suggestions: A bed of arugula and a chopped up tomato with a squeeze of lemon and a sprinkle of salt and pepper was perfect alongside this salmon when it came out of the oven. It would also be great with sauteed new potatoes and asparagus. I have a piece leftover in my fridge, and I plan to make a sandwich out of it on ciabatta, with lemon-dill-caper mayo and more arugula. Delicious!


Friday, May 18, 2012

Bacon and Brie Sandwich

Bacon and Brie 2

You know what? There's not always time to roast a chicken. There's not always planning ahead. Sometimes you just want something to put in your face so that you can sit on the couch and watch another episode of Friday Night Lights. You get home, you're ravenous, and you have to make some magic happen with whatever's in the fridge. A well-stocked fridge helps a lot with this.

A bacon and brie sandwich to the rescue! With some spinach, because vegetables should be a part of dinner. Mustard and pickles for some pizzazz. And we're off!

Warm up a pan and cook a couple slices of bacon. Crack some black pepper on the top while they're cooking.

Toast the bread. Sourdough is delicious.

Spread one side with Dijon mustard, and put some slices of Brie on the other side. The warm toast will start to melt the Brie. We like that.

Spring 2012 290

Veggies for responsible adults! Spinach and bread-and-butter pickles. Unexpected and awesome.

Spring 2012 291

The piece de resistance... PEPPER BACON.

Bacon and Brie Sandwich

A dinner fit for a queen.

Bacon and Brie 3


Friday, May 4, 2012

7 Quick Takes: Ode to my iPhone

Happy happy Friday! This week, I finally traded in my crappy, falling-apart Palm Pixi for a shiny new iPhone 4. I've been playing with it almost nonstop since I got it, so my quick takes this week are going to be iPhone-centered. What are your favorite iPhone apps? I'm all ears!

1. RIP Palm Pixi.


Please tell me you can see why I thought this would be a good way to transition into smartphone-land. I mean, it's cute and tiny (which I liked), has a keyboard (since I was worried I would hate touch-screen typing), and has that little touch screen. If it had performed as promised, it would have been fabulous! ALAS. There's a rubbery layer on the back that just peels off after about 6 months of use. The battery life was atrocious. And about 5 months ago, the button on the side that controls the ringer broke, so I haven't been able to hear call or text alerts since January. Unacceptable. The iPhone is better than my other phone in basic ways: it makes a sound when I have an incoming call. Wow.

2. Pandora!


Wednesday after work, the sun was shining, and it was warm for the first time in weeks! I decided to take my Vibram FiveFingers (which I got on sale a couple months ago) and my Nickel Creek Pandora station for a little spin around the neighborhood. The combination may well change my life. The way I run (even though, let's be honest, I was mostly walking) in the barefoot shoes is completely different, and feels like the way you used to run around when you were a kid playing tag. It didn't feel like jogging (which might as well be called slogging) - it felt like play!

3. Twitter + Instagram!

I started using Twitter on my computer a while ago, but now that I'm using it on my phone, I feel like I'm getting more out of it. I'm able to scroll through and interact a little at a time, which makes it more fun! If you're on Twitter, follow me @elizaraxi.


Instagram was one of the apps I was most excited to start using. See a beautiful thing during your day? Share it. It's a lot of fun, and reminds me to stay present to all the lovely things I see (and delicious things I eat!) in the course of my daily life. If you use Instagram, follow me @elizaraxi there too!

4. I know, I know.


Maybe this is lame, and maybe it's a waste of time. But Angry Birds is pretty dang fun, and my husband and I have been fighting over who gets to play when he gets home from work. Judge away.

5. Redfin + Mint + other apps for grown ups.

Redfin allows you to search for and track real estate listings. It has a great map feature, which is great if you're out and about and want to see if there are open houses happening nearby. Mint keeps track of all your financial accounts in one place. What apps do you use to keep track of your life?

6. Prayer on the go.

The iBreviary app lets me pray in the rhythm of the Church wherever I am. I open it up, and I instantly have the Liturgy of the Hours (prayers for different times of the day that are prayed by religious communities worldwide), daily readings, and lots of common Catholic prayers at my fingertips. I did morning prayer on the train this morning! Super convenient.

7. Quick and easy food sharing!


Sometimes great things happen when you look in your fridge and get creative with what's in there. This was basically my thought process:

I'm starving. Hmmm... I kinda want a burrito. I really don't want to leave the house again, and I don't want to spend any money. I don't have any chicken defrosted. What do I have? A few flour tortillas and a giant bag of broccoli from Costco. I wonder if I could turn that into tacos? Broccoli cheddar tacos? People make broccoli cheddar soups and casseroles! I bet it could be tacos...  Oh! Oh! Let's make them Asian flavored.

And BOOM. One of my new favorite quick dinners was born.

Asian Broccoli Cheddar Tacos

about 2 cups broccoli florets
1-2 tablespoons vegetable oil
1 tablespoon soy sauce
1 teaspoon sriracha (or more to taste)
a couple dashes toasted sesame oil
2 fajita-sized flour tortillas
grated sharp cheddar

Heat the oil in a skillet over medium-high heat, and add the broccoli. Toss for a minute or two, and then add a couple splashes of water to help steam the broccoli. Season with the soy sauce, sriracha, and sesame oil, and continue to cook until the broccoli is bright green with some crispy brown areas on the edges. Place the flour tortillas over a medium flame, flipping every 5-10 seconds, until hot and blistered. Fill each tortilla with half the broccoli, and top with the cheese.

Have a great weekend, and go see Jen for more quick takes!


Monday, April 16, 2012

Balsamic Spinach Stuffed Pork Tenderloin

Spring 2012 145

We've still got a couple of weeks until the glorious return of the farmers' markets to the fair city of Chicago, which means there's still time for a couple more wintry recipes! This juicy pork tenderloin is stuffed with a vitamin- and flavor-packed sauteed spinach mixture, seared, and finished in the oven. It's a perfect dinner for a rainy April weeknight. Soon it will be time for spring peas, asparagus, and rhubarb. But for now, let's use up the root vegetables and apples and enjoy where we are!

Spring 2012 131

stuffed pork tenderloin

Balsamic Spinach Stuffed Pork Tenderloin

1 pork tenderloin, thin end trimmed
olive oil
salt and pepper

For the stuffing:
3 slices bacon, chopped
1/2 cup thinly sliced shallots
5 ounces fresh spinach
1 tablespoon balsamic vinegar
salt and pepper to taste

Preheat oven to 350 degrees. (*Roast some sweet potatoes and apples while you prepare the pork.)

Saute bacon in a large skillet over medium heat until crisp. Using a slotted spoon, remove to a paper towel-lined plate. Reduce heat to low and add shallots. Cook, stirring occasionally, until shallots are caramelized, about 10-15 minutes. Add spinach along with a splash of water and saute until wilted. Add the balsamic vinegar and cook a couple of minutes to mellow. Taste and season with salt and pepper.

Butterfly the pork tenderloin by using a sharp knife to cut into the long side. Stop before you have completely separated the top and bottom halves. Open it up so that it lays flat, cover with plastic wrap, and use the flat side of a meat tenderizer to pound it to between 1/4 and 1/2 inch thick. Remove the plastic wrap and season the inside with salt and pepper. Cut three 10-inch pieces of butcher's twine and evenly space them under the flattened tenderloin. Arrange the spinach filling along the middle of the tenderloin, and carefully roll it up. Arrange it seam-side down, and secure with the butcher's twine.

Preheat an oven-safe skillet over medium-high heat, and add 2-3 tablespoons olive oil. When the oil is hot, add the rolled-up tenderloin seam-side down, and sear all sides for 3-5 minutes, until well browned. Make sure to leave it for at least 3 minutes without moving when you begin the sear, to prevent it from falling apart. Once the tenderloin is browned on all sides, transfer to the oven for 10 minutes to finish cooking through.

Allow to rest for 5-10 minutes before slicing.


Wednesday, March 21, 2012

No-Knead Pizza Dough

Spring 2012 040

This is the pizza dough to end all pizza doughs. It involves no kneading, no rising (only resting), no special equipment. While baking, it blisters and bubbles, and comes out crispy on the outside, chewy on the inside. It is nothing short of perfect.

Spring 2012 057

This dough is like an automatic party. Instructions: Prepare dough one day ahead. Add a few friends, a bottle of wine, and small bowls of toppings. Let each person create their own pizza, and let the fun begin!

Spring 2012 016

No-Knead Pizza Dough 
adapted from Bon Appetit

7 cups all-purpose flour
4 teaspoons fine sea salt
1/2 teaspoon active dry yeast

Whisk flour, sea salt and yeast together in a medium bowl. With a wooden spoon, gradually stir in 3 cups of water until well incorporated. Use your hands to form dough into a rough ball, and transfer to a large clean bowl. Cover bowl with plastic wrap and allow to rest for at least 18 hours in a warm, draft-free area, until it is more than doubled and the surface is covered in tiny bubbles. Turn dough onto a floured work surface and shape it into a rectangle, then cut into six pieces. Working with one piece at a time, fold the corners in toward the center, flip it seam side down, and gently shape into a ball. Transfer to a floured baking sheet. Repeat with remaining dough, and then cover with plastic wrap and allow to rest for an hour. (You can also put it in the refrigerator at this point, and it will keep for 3 days. Remove from the refrigerator and allow to rest at room temperature for 2-3 hours before continuing.)

While the dough is resting, place a pizza stone on a rack in the top third of the oven, and preheat it as hot as it will go (about 550 degrees) for about an hour.

Working with one dough ball at a time, dust with flour and transfer to a floured surface. Gently shape into a 10- to 12-inch disk. Transfer disk to a pizza peel or rimless baking sheet that has been lightly dusted with flour. Increase the oven heat to broil. Top the pizza with your desired toppings and use quick back-and-forth motions to slide it onto the pizza stone. Don't overload with toppings; it becomes hard to move. Broil for 5-7 minutes, rotating halfway through to prevent burning. Remove when the bottom is crisp and golden and the top is blistered. Slice and serve!

Favorite topping combinations:

-Barbecue sauce, diced chicken breast, cheddar or co-jack cheese, and bacon
-Fresh tomato, onion, and bacon, with shredded mozzarella
-Olive oil, lemon zest, and Parmesan, topped with arugula after baking
-Caramelized onion, balsamic-glazed mushroom, and Gorgonzola


Tuesday, January 24, 2012

Wintry Pasta al Forno

potato-pasta casserole

Once in a while, if I can't get myself motivated to clean my house, I invite people over. That usually does the trick. This Sunday, I hosted a little belated birthday dinner for one of my best friends, and I tell you, it was one of the most productive weekends I've ever had. Saturday morning, our Christmas tree was still up (and fully decorated), the front porch still had colored lights on it, and all the evidence of a week in the life of a busy couple (laundry, mail, dishes) was piled everywhere. By Sunday evening, the Christmas decorations were all packed in boxes and moved to the basement, the living room furniture was rearranged, sheets, towels, clothing and dishes were clean and put away, and furniture and floors were dusted, buffed and shining. I even started working on my dastardly project of a messy second bedroom. By the time people arrived, the table was set, appetizers out, Champagne chilled, salad ready, and this delicious pasta casserole in the oven. It was a proud moment, and the beginning of a lovely evening.

Candlelit dinner

girls

I'm usually not into things called "casseroles," because in my brain that word conjures something mushy, bland, and probably drenched in canned cream of something soup. This could not be farther from that. Layers of whole wheat pasta cooked al dente, creamy fontina and tangy Parmigiano Reggiano, mustardy cabbage, and tiny purple and white potatoes. It's comforting without being heavy, and it will warm you from the inside out. This is casserole's sophisticated older sister. I hope you enjoy it!

Wintry Pasta al Forno
adapted from 101cookbooks

Use whatever noodles you like in this recipe, and whatever creamy cheese. I can imagine endless variations; my next one will certainly involve gorgonzola and rosemary.

12 ounces whole wheat fettuccine, broken into 3-inch pieces
1 pound small potatoes (I found the purple ones at Costco!)
2 medium leeks, white parts only, rinsed well and thinly sliced
3 garlic cloves, minced
1/2 medium head of cabbage, cored and shredded
1/2 cup water
1 1/2 tablespoons (or more to taste) whole grain mustard
1 1/2 cups grated Parmigiano Reggiano
16 fresh sage leaves, slivered
4 ounces fontina or other soft, melty cheese, cut into small cubes

Cook the pasta in boiling salted water until al dente, and set aside.  Meanwhile, cover the potatoes with water, salt generously, and simmer until tender, 30-45 minutes. Drain and slice - mine were so tiny, that some of them just got cut in half. It's all good. Season with a bit of salt and set aside.

Melt the butter in a large saucepan and add the leeks.  Saute until soft, about 3 minutes, and then add the garlic and cook until fragrant, about 1 minute more. Stir in the cabbage, and then the broth. Cover and cook until cabbage is tender. Remove from heat and stir in the mustard, 1/2 cup of the Parmigiano Reggiano, one teaspoon of salt, and half of the slivered sage leaves. Taste and adjust seasonings if needed. (I would happily serve this sauteed cabbage as a side dish; it's amazing on its own.)

Butter a 9x13-inch baking dish, and layer half of the noodles, then half the cabbage, potatoes, and half of the fontina and remaining Parmigiano. Repeat with remainder of ingredients, and finish by sprinkling remaining slivered sage over the top.  Bake at 400 degrees until golden and hot, about 45 minutes. Serve immediately.


Wednesday, January 11, 2012

Classic Crab Cakes

December-January 11-12 116

You know how sometimes all it takes to unleash a fully-fledged craving is just the simple mention of something you haven't thought of in a while? A few days before my birthday this year, I read this post, and I knew right then and there that nothing else but crab would do for my birthday dinner. I looked online at some restaurant menus, and then came to my senses and decided to just grab some crab and heat it up at home. Even with a bottle of champagne, a nice loaf of bread, and a salad, we spent less on the whole meal than we would have on one entree at a restaurant. It felt pretty good. Especially when I realized that crab makes for some pretty phenomenal leftovers.

December-January 11-12 085

These crab cakes made a perfect birthday lunch alongside a refreshing, peppery arugula salad with a lemon-caper vinaigrette. Crispy on the outside, filled with simply-seasoned sweet hunks of crab, and a dab of homemade tartar sauce on the side. And since it was my birthday, a mimosa to wash it down. Delicious.

December-January 11-12 111

Classic Crab Cakes
adapted from Cook's Illustrated
yield: 4 cakes

1 pound jumbo lump crabmeat, picked over for shell fragments
2 celery stalks, finely minced
1 tablespoon chopped fresh cilantro or parsley
1/4 cup mayonnaise
1-4 tablespoons plain dry bread crumbs
1 1/2 teaspoons Old Bay seasoning
salt and ground black pepper
1 large egg, lightly beaten
1/4 cup all-purpose flour
1/4 cup vegetable oil

Line rimmed baking sheet with parchment paper. Gently mix crabmeat, celery, cilantro, mayonnaise, 2 tablespoons bread crumbs, and Old Bay in a medium bowl. Season with salt and pepper to taste. Carefully fold in egg with rubber spatula until mixture barely holds together. If the mixture doesn't bind, add more breadcrumbs, a tablespoon at a time, until they do. Don't overdo it - it just barely has to hold together.

Divide crab into four portions and shape into fat, round cakes, about 3 inches in diameter and 1 1/2 inches thick. Arrange on prepared baking sheet, cover, and refrigerate at least 30 minutes or up to 24 hours.

Place flour in shallow baking dish or pie plate. Lightly dredge cakes in flour. Heat oil in a nonstick skillet over medium-high heat until shimmering. Gently lay floured cakes in skillet and cook until both sides are crisp and golden, 4-5 minutes per side. Serve immediately with lemon wedges or tartar sauce.


Tartar Sauce

yield: about 1 cup

3/4 cup mayonnaise
1/2 shallot, mnced
2 tablespoons capers, rinsed and minced
2 tablespoons sweet pickle relish
1 1/2 teaspoons white vinegar
1/2 teaspoon Worcestershire sauce
1/2 teaspoon pepper

Mix together in a small bowl.


Wednesday, November 16, 2011

Vegan Cream of Broccoli Soup

Wait, what?

Did I just say "vegan cream" like it was no big deal?  Ew!  EEEWWWWWWW!!

I think it's weird when people decide to go vegan, and then all they eat is super-processed meat and dairy substitutes.  That stuff is the devil!  Tapioca cheese?  Non-dairy creamer, which is basically just corn syrup?  Tofurky?  I just threw up in my mouth a little.  Don't even get me started on vegan bacon.  *shudder*

I mean, why mess with these abominable food substitutes when there are perfectly delicious all-natural unadulterated vegan things you could eat?


This lovely soup has nothing weird or processed in it, and also nothing that came from an animal.  I am totally on board.  Did you know about the magical creamy properties of raw cashews?  It is nothing short of a revelation.  Now, I'm not going to lie to you and say, "Oh my gosh!  It tastes exactly like cream!"  Because it obviously does not taste anything like cream.  But if you eat this soup, which tastes delicious in its own wonderfully nutty way, you'll feel better, and so will your skinny jeans.  Plus, I assume that in eight short days, you will be stuffing your face with many, many delicious things that contain real cream and real butter, so why don't we do ourselves a favor and make up for it now?

P.S. Just for the sake of full disclosure, that toast in the photo has real, non-vegan, from-a-cow cheddar cheese on it.  I am not a vegan.  Clearly.  I just think real plant-based food is fun.


Vegan Cream of Broccoli Soup

adapted from Joy the Baker

Trivia: the thing that makes Worcestershire sauce un-vegan is anchovies.

1 1/2 cups raw cashews
1 small onion, diced
2 cloves garlic, minced
1 tablespoon olive oil
2 heads broccoli, washed and separated into florets
1/8 teaspoon ground nutmeg
1 teaspoon ground cumin
1 teaspoon salt
1/4 teaspoon ground mustard seeds
black pepper to taste
juice of 1 lemon
1 tablespoon vegan Worcestershire sauce
4 cups water

Place raw cashews in a bowl with enough water to fully cover, and soak for one hour.  Drain.

Steam broccoli until tender and bright green.  Drain and set aside.

Place the olive oil in a large saucepan over medium heat.  Add onions and saute until translucent, about 5-6 minutes.  Add garlic and cook one minute more.  Add seasonings, and continue cooking for a few seconds.  Toss in the cooked broccoli, mix it all up, remove from the heat and set aside.

Place half of cashews, half of broccoli mixture, and 2 cups water into a blender, and blend until smooth.  Pour into a soup pot over low heat, and repeat with remaining ingredients.  Add lemon juice and Worcestershire sauce, and more water if desired.  Serve warm.

Yield: 4-6 servings.


Tuesday, November 8, 2011

Roasted Buttercup Squash


The last day that they had the outdoor farmer's market near my office this year was a cold, drizzly, dreary day that made you just feel so sorry for the few farmers who had decided to man their stands until the bitter end.  Three days later, the market near my house (yup, I'm lucky enough to have a weekday one about 2 blocks from work, and a weekend one steps from my apartment) opened warm, sunny, and breezy - the kind of fall day you live for, that you can't help but savor.  I've been trying to branch out to different hard squashes (butternut and acorn rut, anyone?), and that day I found a Red Thai squash (the orange one above) and a Buttercup squash (the green).  Oh yeah!  And a magic brussels sprout wand.  Don't you love that they grow like that?  Look at this picture of a whole field of them!  It's like alien vegetables!


They look very similar to acorn squash, don't they?  Taste similar, too - more flavorful, I thought.  Into each little quarter went a bit of butter, maple syrup, a pinch of salt and a whisper of cayenne pepper.  For a second I was reminded of my brief, ill-advised foray into the world of the Master Cleanse and shivered.  Then I popped these babies into the oven, and in about 45 minutes, here's what came out:


Ahhhhh.  Comfort food.  Look at those little pools of love! 


A pan-seared pork chop, some brussels sprouts, and roasted squash.  Virtues: low-carb, more vegetables than non-vegetables, multiple colors.  Vices: butter.  But who's counting?

Wednesday, August 31, 2011

"Yankee" Slow-Cooker Pulled Pork


My dad is the king of pulled pork sandwiches.  He's from Memphis, so it makes sense that he would be.  He has a very authentic way of preparing them.  He hickory-smokes the pork shoulder for hours and hours.  And hours.  He makes cole slaw.  He serves the sandwiches on buns with spicy Memphis barbeque sauce, and the cole slaw right on top - not optional.  While I would love to be able to make these sandwiches, since just thinking about them makes me mouth start to water, I don't have a smoker, or my dad's eternal patience to keep adjusting the coals and checking the pork to make sure it's at the right temperature.  So I settle for another preparation of a pork shoulder, which does the trick in a pinch: the slow cooker.


Dad would call this Yankee pulled pork.  It is.  It doesn't come with cole slaw, and it's doused in a thick, sweet sauce.  It's not authentic at all.  But it still tastes freaking amazing.  Because it's still PORK.

Amen.

"Yankee" Slow-Cooker Pulled Pork

1 3- to 4-pound bone-in pork shoulder

1 12-oz. can Dr. Pepper
1 onion, roughly chopped
3 cloves garlic, smashed
1/3 cup bourbon
1/2 can chipotle peppers in adobo (or chipotle salsa, if you didn't read the label)

Spice Rub:
5 tablespoons kosher salt
2 tablespoons black pepper
1 teaspoon smoked paprika
1 teaspoon chili powder
3 tablespoons brown sugar
1 teaspoon dried thyme

Coat the outside of the pork shoulder with the spice rub, really rubbing it into the meat.  Place it in a dish or ziploc bag, and refrigerate it for 2-3 hours or overnight.  Heat a couple tablespoons of olive oil in a skillet, and brown the meat on all sides.  Place onions and garlic in a layer in the bottom of the slow cooker.  When the pork is browned, place it on top of the onions.  Pour Dr. Pepper, bourbon, and chipotles over the pork, place the lid on the slow cooker, and cook for 4-6 hours on high, or 8-10 on low. 

Remove meat to a plate, discard any bones, and use two forks to shred the meat.  Then strain some of the extra fat off of the liquid in the slow cooker.  You can do this a couple of ways.  If you have a lot of time, you can put the liquid in the fridge, and allow it to cool completely.  The fat will sit on top in an orangey-yellow layer, and you can just scrape it off and throw it away.  But if you just got home from work, and want to eat the pork as soon as possible, you can just use a big spoon to carefully skim the fat off the top.  

Once the extra fat is skimmed, adjust the seasonings in the sauce to taste.  I added some barbeque sauce, ketchup and apple cider vinegar, stirring and tasting until it was the way I like it.  Play with it until you get it right, and then add the shredded meat back in and keep it warm until you're ready to eat.  Pile it high on toasted buns, and top with pickles, onions, cole slaw... whatever makes you happy.


Tuesday, August 30, 2011

Steak 'n' Bacon Tacos


As I was standing in the kitchen beginning to prepare this dinner, the Coppertop Guy munched on some tortilla chips and asked me,

"Can you think of a savory food that would not taste better with bacon?"

I thought for a second, and said that I couldn't think of one.  And then he proposed that we add bacon to our dinner.  Our dinner of steak tacos.  It's your week, baby, why not?

This is a great way to use leftover chicken or steak.  Just cut it into small pieces, add some Mexican flavor, and you've got yourself some fantastic tacos.


I love to heat tortillas over an open burner.  You have to be quick, or you'll burn your fingers, but they get all scorched and hot and delicious that way.  Keep flipping every 5-10 seconds or they'll burn, and when they get blistered and hot, transfer them to a foil packet to keep them warm.


Steak Tacos

2 tablespoons olive oil
1 already-cooked lean steak, cut into small cubes
1/2 small can fire-roasted green chilies
1/2 teaspoon ground cumin
1/2 teaspoon smoked paprika
1/2 teaspoon chili powder
1/2 teaspoon dried oregano
salt and pepper to taste

Heat olive oil in a skillet over low heat.  Add cubed steak, chilies, and spices and toss until steak is warmed through.  You want to cook it as little as possible so it still retains its color and flavor.  Fill warmed soft corn tortillas with steak, and top with your favorite toppings.  If you're the birthday boy, that means sauteed red peppers, shredded cheddar cheese, and bacon.

Monday, August 29, 2011

Let the birth-week begin!


This weekend was flawless.  Sunny, not too hot, and filled with lots of friends and food.  On Saturday, we watched the series premiere of The Pioneer Woman on the Food Network!  It was all I could have dreamed.  The horses, the cowboy hats and boots, the cute kids, the food!  Ah!  Then we ran some errands, and made a couple of additions to our deck garden  A yellow hibiscus (which I didn't even know existed until I saw it at the store) and a pink phlox.  They add a lot more visual interest and color, and even though they're late-comers, they're perennials, so we'll get to enjoy them for several summers to come.


 I also harvested my garden's first tomatoes!  Tiny sweet pear-shaped yellow heirlooms.  

And on Saturday night, we began the 7 nights of feasting to celebrate my husband's birthday!  First on the menu: broiled steaks, cheesy mashed potatoes, and green beans.


I was being cheap, so I got these bottom round steaks that were on sale.  A little tough, but still pretty good!  I wish that ribeyes had been on sale, though.  I really do.

Cheesy Mashed Potatoes

Fair warning: these are not low-fat.

2 pounds russet potatoes (about 6 medium), peeled and cut into chunks
4 tablespoons butter
1/2 cup sour cream
1/4 cup half and half
1 cup shredded sharp cheddar cheese, plus more for sprinkling on top
kosher salt and freshly ground black pepper to taste
3 pieces of bacon, cooked until crispy, chopped into bits

In a large pot, cover potatoes with at least an inch of water.  Bring to a boil, and boil for 5-10 minutes, until a sharp knife inserted into a potato comes out very easily.  Drain, and return to the pot over low heat.  Mash with a potato masher.  Add butter, half and half, and sour cream, salt and pepper, and continue to mash together.  Add cheese and keep on mashing.  When it's all combined and melty, serve alongside steaks and green beans topped with more cheese and bacon.

Serves 4.